About GPUResize 2
GPUResize 2 resizes and reshapes images with GPU-accelerated filters shared across After Effects, Premiere Pro, and OpenFX hosts such as DaVinci Resolve. It supports exact pixel dimensions, percentage scaling, four-corner distortion, fixed-output-size Mosaic, multipass resizing, pixel-art methods, content-aware scaling, and optional output sharpening.
How it works
Choose the geometry first, then the resampling method. Finish with optional sharpening. The diagram shows the order of operations within the effect.
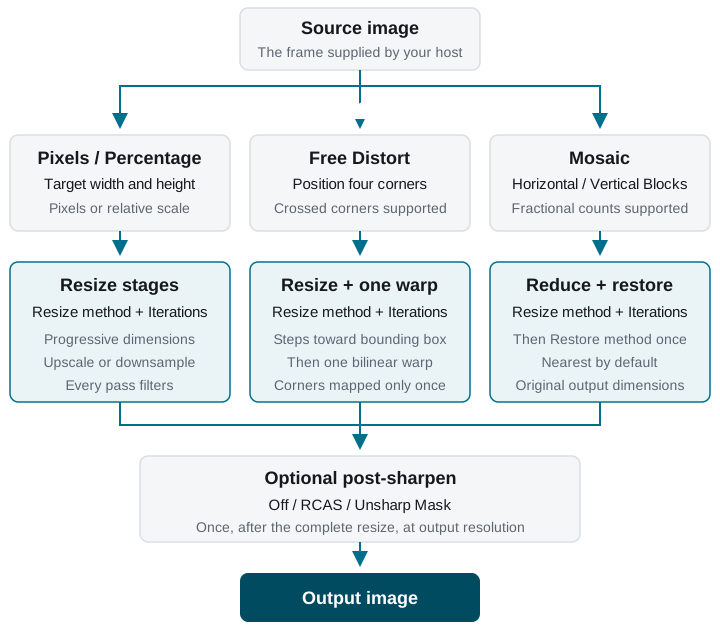
The filter runs at every resize stage. Classic filters, FSR, pixel-art methods and Content-Aware are choices within the resampling step, not extra stages to stack. Available behavior depends on the method and size mode; see Resize methods for details.
Installation
The release archive contains Mac and Win
directories. Each includes the After Effects/Premiere and OpenFX builds
for that platform. Install only the files for the applications you use.
After Effects and Premiere share the same GPUResize 2 Adobe plug-in.
DaVinci Resolve also requires the packaged
GPUResize2.setting Fusion macro. Copy it to Resolve's user
Fusion/Macros directory when installing manually. Restart
each host after installing or replacing a plug-in.
Size modes
Pixels
Choose a standard resolution preset or enter an explicit New width and New height. Fit mode controls how the source fits the target frame:
- Stretch uses the exact requested dimensions, allowing non-uniform scaling.
- Fit inside preserves proportions and fits the whole image inside the frame.
- Fit outside preserves proportions and covers the frame, extending beyond it.
Both width and height define the target frame and remain editable with a custom size. Fit inside rounds the calculated dimension down; Fit outside rounds it up to cover the frame. Output dimensions must remain within 1–8192 pixels. Single-pixel outputs are supported on either axis; Fit inside keeps the short axis at least one pixel even for a 1x1 target.
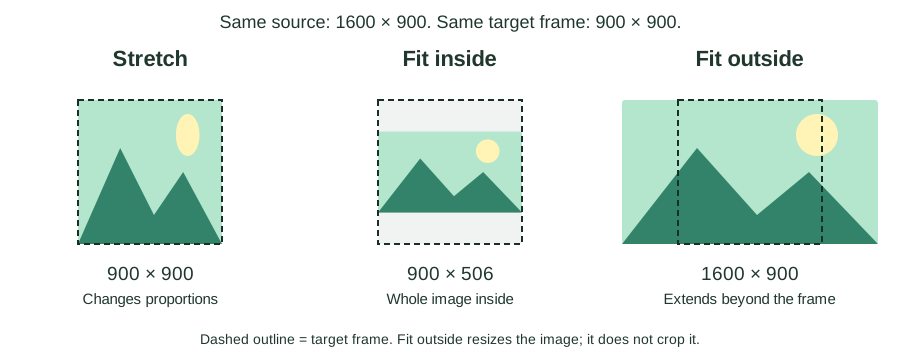
For a 1600 × 900 source and a 900 × 900 target frame, Stretch outputs 900 × 900, Fit inside outputs 900 × 506, and Fit outside outputs 1600 × 900. The dashed square shows the target frame, not a crop: GPUResize 2 resizes the full image. Any clipping by the host composition or timeline is separate.
In After Effects and Premiere, rectangular resizing is centered on the input image bounds, not an independently moved layer Anchor Point. Output bounds are aligned to whole pixels, so switching between even and odd dimensions can shift the geometric center by half a pixel.
Percentage
Set width and height independently as percentages of the source. A
value of 100% x 100% preserves the original dimensions.
Different width and height values create non-uniform scaling.
Free Distort
Drag Top left, Top right, Bottom left, and Bottom right to reshape the image. You can stretch it into a slanted rectangle, bring two corners together to make a triangle, or cross the corners to fold it over itself. Where two parts overlap, one part covers the other.
GPUResize uses a bilinear warp to stretch the picture between the four corners. Iterations can change how soft or crisp the picture looks while keeping the shape you set. See Multipass for how this works.
Mosaic
Reduce the internal resolution without changing the image's output size or position. Horizontal Blocks and Vertical Blocks set the grid's column and row counts, independently, from 1 to 8192. Defaults are 160 and 90. Fractional counts are supported: on a 1920-pixel-wide input, 76.8 columns give 25-pixel-wide blocks. The grid starts at the top-left; its final partial cell is clipped at the image boundary. Enter the input width divided by the desired block width (and likewise for height) to control block size instead.
For a 160x90 grid, enter 160 and 90 directly. For 25-pixel blocks on a 1920x1080 source, enter 76.8 and 43.2. Values remain fractional when entered manually or supplied by an AE expression; the renderer does not truncate them. OFX advertises a drag increment of 1. Adobe hosts use their native floating-point controls, so fine-adjustment behavior follows the host.
Animate a smooth mosaic zoom. Block counts are not rounded to whole numbers: values between keyframes remain fractional too. Animate Horizontal Blocks and Vertical Blocks together to smoothly enlarge or shrink the mosaic grid, without whole-count stepping. Fewer blocks make larger cells; more blocks make smaller cells. The output image dimensions remain unchanged.
Resize method and Iterations control the reduction. Restore method returns the reduced image to its original size in one pass; its default, Nearest, creates visible blocks. Independent counts allow rectangular blocks. Both color and alpha are resampled, so masked boundaries also become blocky. Use a masked copy above the original footage to mosaic a selected region. Optional post-sharpen runs after restoration. When the counts equal the input dimensions, both resize and restoration filters still run at 1:1. Smoothing filters can change the image without changing its dimensions. Custom dimensions in Pixels mode also support 1x1, 1xN and Nx1 output.
Resize methods
GPUResize 2 includes conventional reconstruction filters, edge-aware upscaling, pixel-art methods, and content-aware scaling.
| Group | Methods | Typical use |
|---|---|---|
| Basic | Nearest, Bilinear, Triangle, Area | Previews, masks, straightforward scaling, downscaling |
| Smooth and cubic | Notch, Parzen, Bell, Cubic, Mitchell, Keys, Simon, Rifman | A range of smoothing and edge contrast; Mitchell for photos, Keys for graphics |
| Sinc | Lanczos 6, Lanczos 8, Lanczos 12, Kaiser, Sinc 4, EWA LanczosSharp | Detail retention with possible ringing on strong edges; EWA for diagonals |
| Edge-aware | FSR 1 EASU | Upscaling while retaining prominent edges |
| Pixel art | Scale2x, Eagle | Hard-edged low-resolution artwork |
| Content-aware | Content-Aware | Uneven resizing based on contrast; creative distortion |
Both Resize method and Restore method list the groups in this order, without divider rows. Lanczos 6, 8 and 12 are consecutive, followed by Kaiser. The resolution Preset menu retains its separators. The classic filter names and Lanczos width convention follow terminology used in Nuke; the Lanczos numbers are the kernel width in pixels, so Lanczos 6 has three lobes, Lanczos 8 four and Lanczos 12 six.
Choosing an interpolation filter
There is no single best filter for every image. Compare the result at the final output size, especially around fine texture, diagonals, and transparent edges. Disable post-sharpen while comparing filters so you can judge the resize itself. Ringing means light or dark bands next to a strong edge.
Clamp Ringing
Clamp Ringing limits a filtered result to the range of its contributing samples. It suppresses overshoot from sharp cubic and sinc filters, but cannot remove every visible band or repair aliasing already in the source. It can also change fine edge contrast. It is off by default; switch it on when Mitchell, Keys, Simon, Rifman, Lanczos, Kaiser, Sinc 4 or EWA LanczosSharp leave visible bands. Nearest, Bilinear, Triangle, Area, Notch, Parzen, Bell, Cubic and the pixel-art methods never ring, so it changes nothing for them. It works at every bit depth, including 32 bpc float.
Filtering space
Filtering space selects how colours are mixed during resizing:
- Original (default) filters the RGB values supplied by the host, unchanged.
- Log compresses RGB before filtering and reverses that compression after each resize stage. It can change the balance of bright and dark edges, but is not a camera Log profile and is not automatically more accurate.
- Lab filters lightness and the two colour-opponent channels in CIELAB, then returns to RGB. It can change colour transitions and saturation.
- Degamma 2.2 removes a gamma-2.2 encoding before filtering, then restores it after each resize stage. It uses a pure power curve, not the exact sRGB transfer function. For already-linear input (including ACEScg), use Original instead of applying degamma again. No mode performs automatic ACES conversion.
Lab uses a fixed linear Rec.709 RGB / D65 interpretation. GPUResize does not detect the project profile or apply an sRGB, Rec.709, PQ or HLG transfer curve. For a colourimetric Lab workflow, convert the source to linear Rec.709 before GPUResize and convert back afterwards. On other RGB encodings, treat Lab as a creative interpolation option rather than a colour-managed conversion.
The conversion operates on unpremultiplied colour, then restores premultiplication before mixing pixels. Alpha itself is never colour-transformed. Each multipass stage returns RGB; Mosaic uses the selected space for both reduction and restoration. Post-sharpen always runs afterwards in RGB. Nearest and Pixel - Scale2x/Eagle select existing pixels, so they bypass colour conversion; the control is greyed out when neither active resize method mixes colours. Nearest at 1:1 remains exact in all filtering spaces. Other methods still apply their kernels at 1:1; matching dimensions do not disable filtering.
At pixel-aligned 1:1, with post-sharpen disabled:
| Methods | Behaviour at 1:1 |
|---|---|
| Nearest, Bilinear, Triangle, Area, Cubic, Keys, Simon, Rifman, Lanczos 6/8/12, Kaiser, Sinc 4 | Interpolating kernels: mathematically reproduce the input samples. |
| Parzen, Bell, Mitchell, Notch, EWA LanczosSharp, FSR 1 EASU | Still filter the image and can change detail even without changing its dimensions. |
Iterations still applies each pass at 1:1. For example, Mitchell at 100% with two iterations filters twice; it is not a bypass. Floating-point arithmetic can introduce small differences even in Original, and filtering-space round trips can introduce additional rounding. Only Nearest promises exact sample selection here. Pixel - Scale2x/Eagle and Content-Aware use their own edge-aware or content-dependent rules rather than these fixed kernels.
Negative values and HDR are supported. Sharp filters can produce much stronger overshoot in Log, especially near transparent edges. Compare Clamp Ringing on and off. On Premiere's half-float path, transformed results are limited to the finite half-float range rather than overflowing to infinity.
Meet the filters
| Filter | Where it comes from, what it does | Pick it for |
|---|---|---|
| Nearest | Copies the single closest source pixel, so no new colors ever appear. Blocks stay blocks, which is exactly what masks, pixel art and index-like data want. Aka Impulse in Nuke. | Masks, exact values |
| Bilinear | Hardware-style interpolation: matches ordinary GPU linear texture filtering by blending the four nearest pixels. Smooth, with a fixed sampling footprint that can miss fine detail when shrinking. | Previews, quick scaling |
| Triangle | Scale-aware tent filtering: the same linear weighting as Bilinear when enlarging, but a wider source footprint when shrinking. A practical antialiased reduction rather than a fixed four-pixel blend. | Soft downscaling |
| Area | Averages the source coverage of an output pixel. A useful starting point for reducing fine patterns; it can reduce aliasing but does not guarantee a moiré-free image. On an enlarged axis it uses linear interpolation. | Downscaling texture |
| Notch | A broad, flat-topped cubic blend (B = 1.5, C = -0.25). It can quiet repeating patterns without adding ringing, but also softens wanted detail. Compare it with Parzen rather than treating softness as a fixed ranking. | Moiré, screen patterns |
| Parzen | A cubic B-spline (b = 1, c = 0), used directly as smoothing weights. Broad, positive weights soften transitions without adding ringing. This is a smoothing reconstruction, not an interpolating spline with a coefficient prefilter. | Soft, halo-free edges |
| Bell | Combining three box averages gives a rounded quadratic B-spline, often mistaken for a Gaussian. It smooths transitions without adding sharpening halos. | Gentle smoothing |
| Cubic | The plain Hermite cubic (B = 0, C = 0): an eased blend between the two nearest pixels on each enlarged axis. Smooth transitions without ringing. Cubic is also Nuke's default filter; that is a host choice, not a quality guarantee. | Smooth upscaling |
| Mitchell | Mitchell and Netravali's 1988 study explored the balance between blur, jaggies and ringing. The B = C = 1/3 recipe is a useful compromise to try on photos, with some smoothing and possible mild halos. | Balanced starting point |
| Keys | Robert G. Keys published his cubic-convolution analysis in 1981. This b = 0, c = 1/2 setting is also known as Catmull-Rom; it produces crisp transitions with possible halos at hard edges. | Crisp graphics |
| Simon | Named for K. W. Simon's resampling work. Its B = 0, C = 0.75 curve joins smoothly in curvature, giving stronger edge contrast than Keys, with a greater risk of visible outlines. | Sharper graphics |
| Rifman | The sharpest cubic of the family (b = 0, c = 1), named after Samuel Rifman’s 1973 work on resampling satellite imagery. Expect visible halos on hard edges; pair it with Clamp Ringing. | Maximum cubic sharpness |
| Lanczos 6 | A sinc tapered by another sinc, associated with Cornelius Lanczos's sigma factors and Claude Duchon's 1979 filtering paper. Radius 3, width 6: often called Lanczos 3 where names count radius/lobes instead of full width. | Sharp all-rounder |
| Lanczos 8 | Radius 4, width 8. A wider neighborhood changes the balance of detail, alias rejection and ringing. Compare it with Lanczos 6; the extra samples are not automatically an improvement. | Fine texture |
| Lanczos 12 | Radius 6, width 12: a wider version of the same Lanczos construction. It changes fine detail and can spread ringing farther around an edge; a larger number is not a quality score. | Detail experiments |
| Kaiser | A sinc tapered by James Kaiser's Bessel-based window, from digital signal processing. A different taper from Lanczos at the same radius of 3; compare edge texture and halos rather than assuming one always rings less. | Alternative to Lanczos 6 |
| Sinc 4 | The raw sinc, cut off two pixels either side with no window at all, as RenderMan and Nuke define it. Hard, glassy edges with strong ringing: the reference point the windowed filters are softened from. | Hardest edges |
| EWA LanczosSharp | Uses a radial, windowed-jinc kernel with a sharpening adjustment associated with Nicolas Robidoux. The circular or elliptical footprint treats diagonal detail differently from separate row and column filtering. | Diagonals, uneven scale |
| FSR 1 EASU | AMD’s Edge-Adaptive Spatial Upsampling, open-sourced in 2021 to upscale games in real time. It reads local edge direction and rebuilds contours along it. | Clean-edged upscaling |
| Pixel - Scale2x | Andrea Mazzoleni developed Scale2x for AdvanceMAME in 2001; its rule is related to LucasArts' earlier EPX. GPUResize adapts the neighbor-copying rule to requested dimensions, with adjustable color tolerance. | Enlarging pixel art |
| Pixel - Eagle | A late-1990s emulator filter that rounds corners by comparing three neighbors. Letters and single-pixel details can blob together. | Retro sprites |
| Content-Aware | Changes where content goes rather than how neighbors blend: an importance map decides which areas may be squeezed. Protect alpha makes transparency boundaries count too. | Changing aspect ratio |
Filter details
Triangle and Cubic have a one-pixel kernel radius; Bell has 1.5 pixels; the other cubics and Sinc 4 have two; Lanczos 6 and Kaiser three; Lanczos 8 four; Lanczos 12 six, all before downscale footprint adjustment. Kaiser combines a sinc kernel with a Kaiser-Bessel window. Larger Lanczos neighborhoods increase sampling work without guaranteeing a better image.
For ordinary resizing, FSR 1 EASU uses Area when either dimension is reduced. At 1:1 and in Free Distort, it uses its EASU path. In Free Distort, Area is replaced by Triangle.
Nearest preserves uniform pixel blocks at whole-number enlargement. Scale2x and Eagle have additional edge controls below; Content-Aware has its own redistribution controls.
Pixel Art tuning
Edge sensitivity controls how readily Scale2x and Eagle classify nearby pixels as belonging to the same region. Lower values accept larger color differences as a match; higher values require a closer match. Increase it when similar but distinct colors are being grouped together.
Content-Aware tuning
Amount. Blends between regular geometric scaling and content-aware redistribution.
Protect alpha. Includes transparency boundaries in the importance map.
Rigidity. Flattens the importance weights toward uniform scaling as it increases. At 100%, the content-aware redistribution is neutral.
Reading the filter comparisons
A filter decides how neighboring samples contribute to a new pixel. Its kernel is that weighting pattern; its support is how far it reaches. Positive weights blend. Negative weights subtract some neighboring influence, which can keep an edge crisp but can also create light and dark halos.
The figures below are original numerical teaching examples, computed on the CPU from the stated kernels and pixel rules. They are not host screenshots or speed measurements. Each comparison uses one pass with post-sharpen off. Display magnification uses nearest-neighbor replication to keep the calculated pixels visible. The filter descriptions refer to GPUResize 2's implementation; identically named filters in other software can use different conventions.
Ringing: sharpness has a shape
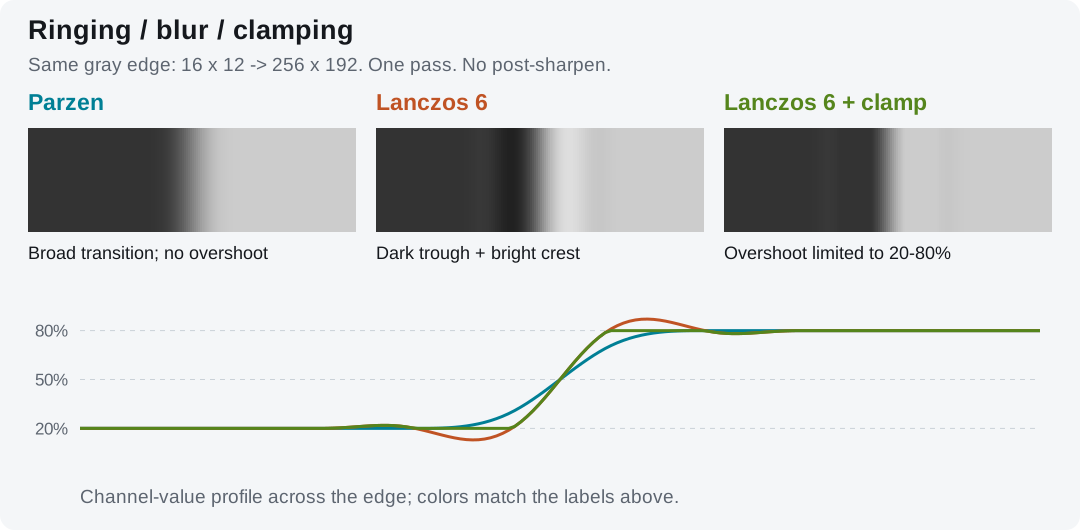
Read the bands beside the edge. Parzen spreads the transition without overshooting. Lanczos 6 produces a darker trough and a lighter crest; these can look like extra definition at normal viewing size. Clamp Ringing removes the out-of-range overshoot in this simple example. It does not reconstruct missing detail. Gray levels of 20% and 80% leave room to see both halos without clipping them to black or white. Profiles show channel values, not perceived brightness. See Parzen, Lanczos 6, and Rifman below.
Aliasing: when fine detail becomes a false pattern
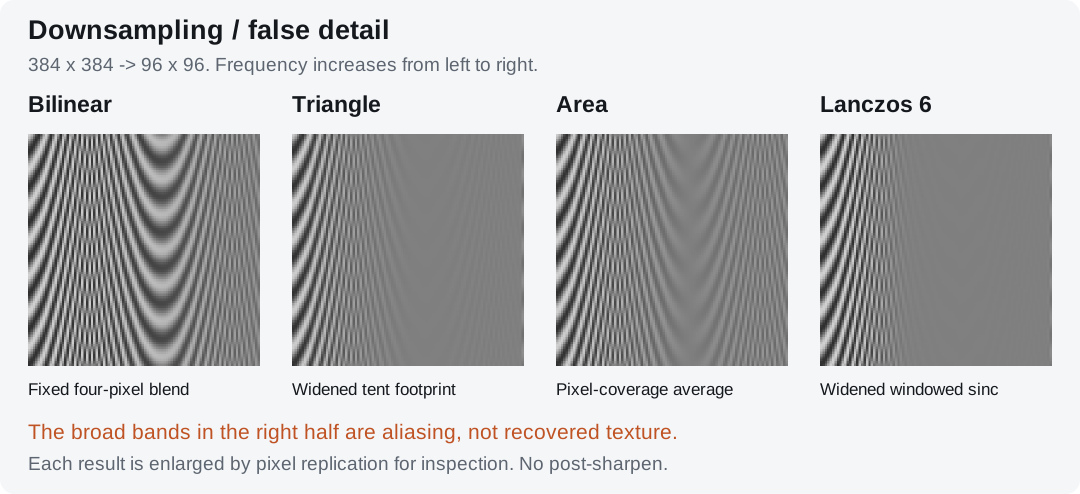
Look for broad bands that were not in the source. A small sampling footprint can turn fine lines into false low-frequency stripes. Scale-aware averaging reduces that effect, at the cost of texture contrast. The smooth region in a reduced image can be the correct result when the original stripes are too fine for the new pixel grid. No filter can reliably undo aliasing already recorded by a camera. Inspect moving footage as well: an acceptable still can shimmer. See Bilinear, Triangle, Area, and Notch below.
Pixel art: preserve blocks or redraw the contour?
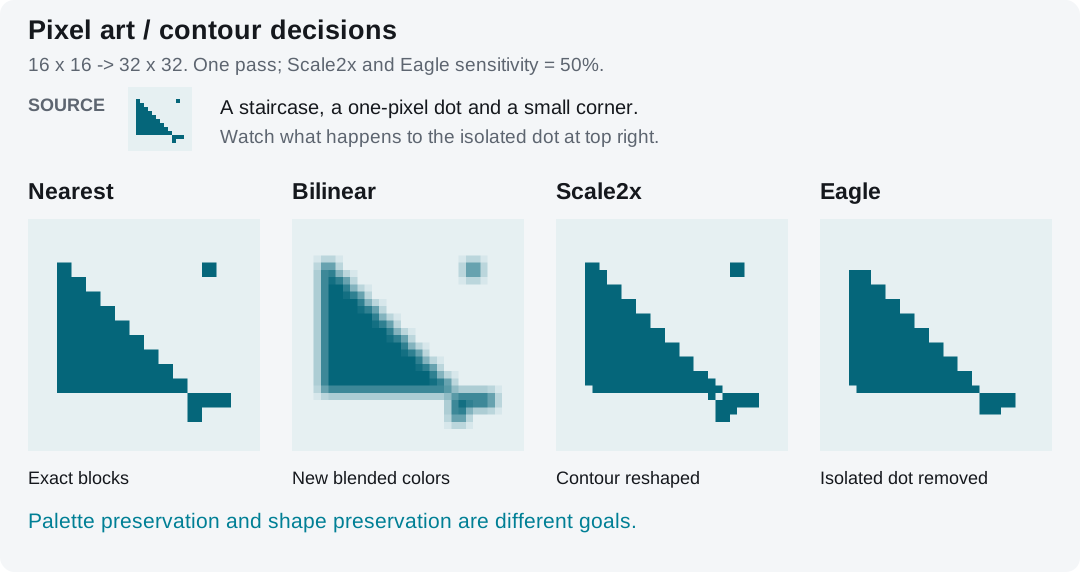
Look at the diagonal and the isolated dot. Nearest preserves the authored blocks. Bilinear introduces intermediate colors. Scale2x and Eagle use local patterns to change a contour while copying existing colors. Eagle can erase an isolated pixel when the surrounding neighbors agree. That is a shape decision, not ordinary blur. The test uses distinct palette colors so the neighbor comparisons are unambiguous. See Scale2x and Eagle below.
Filter reference in depth
Keep the same output dimensions when comparing methods. Start with Iterations = 1 and Post-sharpen off, then add those controls once you have chosen the underlying look. Suggestions below are starting points, not a ranking from worst to best. Origin notes distinguish a named algorithm from a general mathematical operation; not every menu entry has a single documented inventor.
The linked papers and original project documentation provide further reading. For an accessible overview of kernels, support and ringing, see PBRT: Image Reconstruction.
The same three tests for every method
Every entry shows actual GPUResize output: a checkerboard, a human eye and fine sunlit hair. Look for halos at edges, changes in the eyelashes and iris, and disappearing or broken hairs.
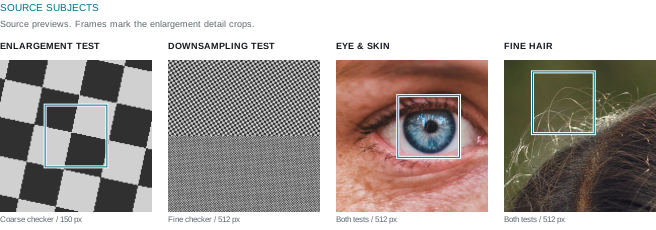
Top row - enlargement: 150 x 150 to 512 x 512 (341.3%). The checker starts with two gray levels and no antialiasing. The photographs are prepared once by BOX averaging the 512px sources. The row shows identical 208 x 208 pixel crops, marked above, with no resizing after the filter.
Bottom row - downsampling: 512 x 512 to 104 x 104 (20.3%). This is a separate test from the full sources, not a reduction of the enlarged output. The checker uses finer cells to reveal aliasing and false patterns; the eye and hair use the same photographs. The full 104px results are shown at 2x by repeating each pixel, without smoothing. Compare unwanted patterns, remaining detail and softened edges.
All examples use Iterations = 1, Post-sharpen off and Clamp Ringing off, 8-bit RGB and lossless images. Each method starts from the same input for that row. Any automatic internal reduction stages still apply. These are appearance examples, not speed tests or a ranking of quality.
Photographs: Erik Mclean / Unsplash (eye) and Pexels, photo 5163914 (hair). The checkerboard is an original test pattern.
Nearest
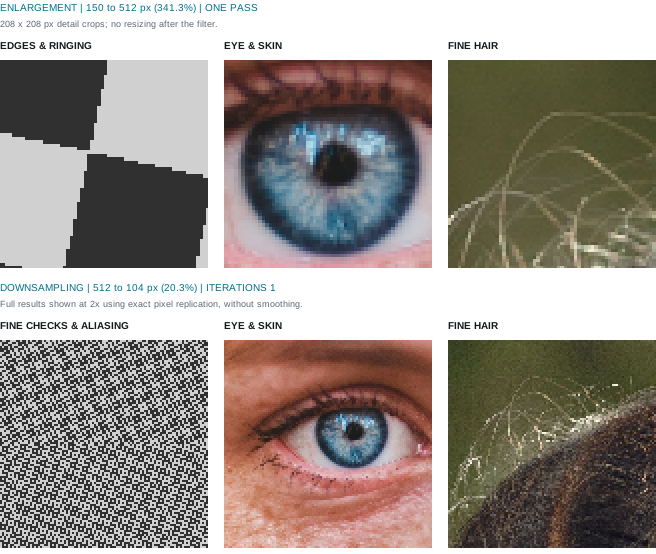
Try it when: you want visible square pixels, a fixed palette, or crisp Mosaic blocks. Use a whole-number enlargement when every original pixel should become an equally sized block.
What it does: Nearest picks one source pixel and copies its color. Think of enlarging a mosaic by making each tile bigger: the colors stay the same, but diagonal edges turn into stairs. At whole-number scales such as 2x or 3x, the blocks stay evenly sized. At other scales, some blocks need an extra row or column. Shrinking is less forgiving: a thin line or tiny dot can disappear if the filter never picks it. That makes Nearest great for a deliberately pixelated look, but unreliable for preserving small details in a photograph.
Background: nearest-neighbor interpolation is a basic sampling rule rather than a filter credited to one modern inventor. Some compositing applications call it Impulse. Choose it for the look or the data requirement, not as a general cure for soft photographic footage. Post-sharpen can change its colors.
Bilinear
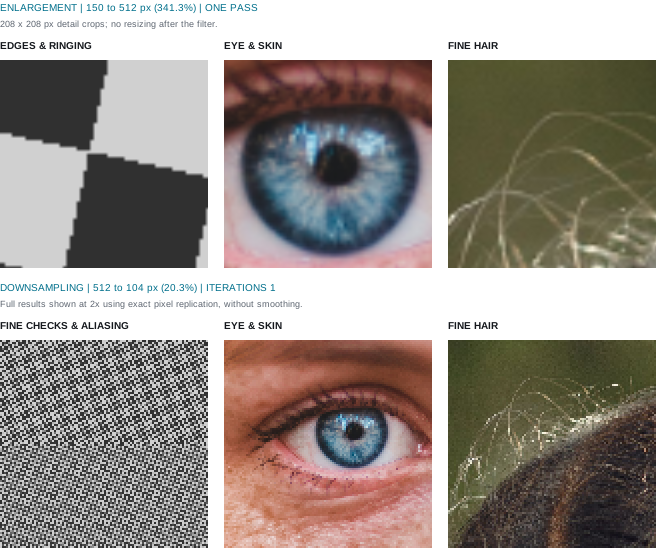
Try it when: you want a simple, smooth enlargement and would rather have a little softness than an outline around every edge. It also makes a useful baseline for comparing sharper filters.
What it does: This is hardware-style interpolation: the familiar blend used by GPU texture sampling. Each new pixel mixes the four closest source pixels. The result is smooth, with no extra bright or dark fringe created by the blend, but small details can look soft. Shrinking exposes its limitation: it still looks at just four neighbors, even when many more pixels need to fit into one. Striped fabric or window blinds can turn into false patterns. Try Triangle or Area when that happens.
Background: this is ordinary linear interpolation applied on two axes, not a proprietary reconstruction method. Its small, fixed footprint makes it a familiar texture-sampling operation on GPUs. In GPUResize 2, Triangle has the same reconstruction at enlargement; their difference becomes useful when the image is reduced.
Triangle
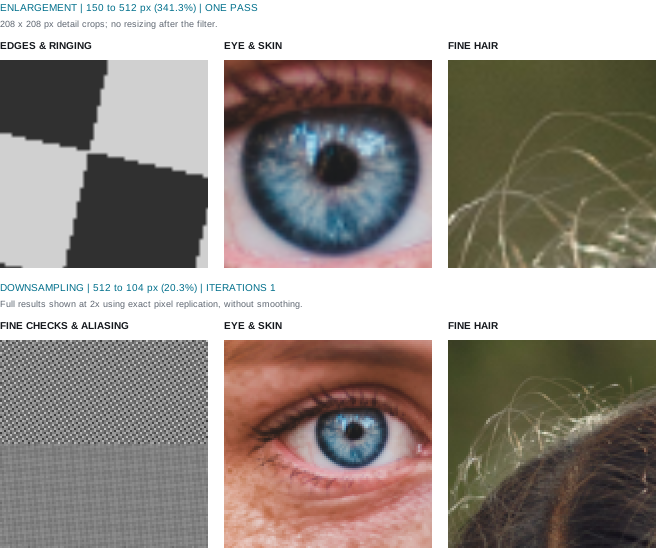
Try it when: you are shrinking fine patterns and want fewer false stripes without adding halos. Try it on matte edges or footage that already looks heavily sharpened.
What it does: Imagine a small tent centered on the spot you want to sample. Nearby pixels have the most influence; the influence falls evenly to zero at the tent's edges. When enlarging, Triangle gives the same result as Bilinear. When shrinking, its tent gets wider, gathering more pixels into the average. That is the useful difference: it smooths fine patterns before they have to fit into fewer pixels. The price is softer detail, but it does not add the light and dark fringes that sharper filters can create.
Background: combining two box averages gives a triangular spread of weights. Mathematicians call this a first-degree B-spline; see Unser, Splines: A Perfect Fit for Signal and Image Processing (1999). The name describes the kernel's shape, not an inventor. It is a useful positive-weight reference: if a sharp filter seems too harsh, compare its edge to Triangle before adding sharpening.
Area
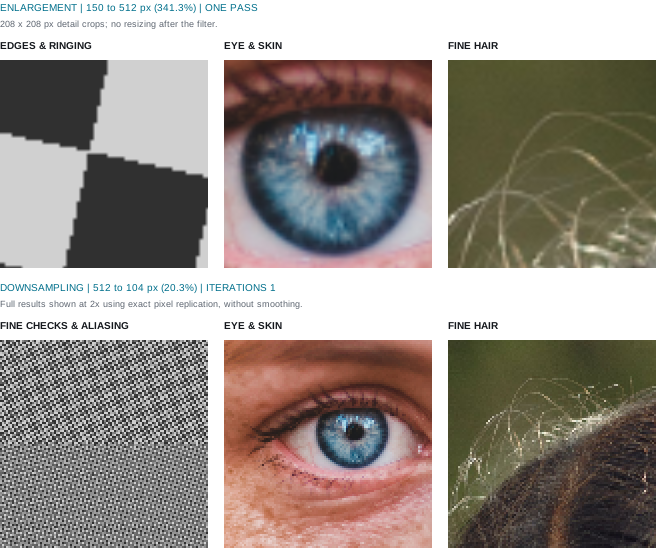
Try it when: you need to shrink a photo or graphic substantially, or average the pixels inside Mosaic cells. Start here when fine lines turn into stripes or sparkling dots.
What it does: Think of laying a smaller grid over the original image. Each new pixel averages the source pixels beneath it; a pixel that is only partly covered contributes only that part. This is a straightforward way to pack many pixels into fewer ones. Fine details become quieter, and this averaging does not add ringing. It still cannot tame every repeating pattern. On an axis that grows instead of shrinks, GPUResize uses linear interpolation. Compare the result at its final size, especially on fabric, screens and small lettering.
Background: area averaging is geometric integration, not a filter with a single accepted inventor. GPUResize 2 uses bounded reduction stages where needed to cover large changes. In the final Free Distort warp, the Area selection uses Triangle instead; that warp is not exact polygon-area integration.
Notch
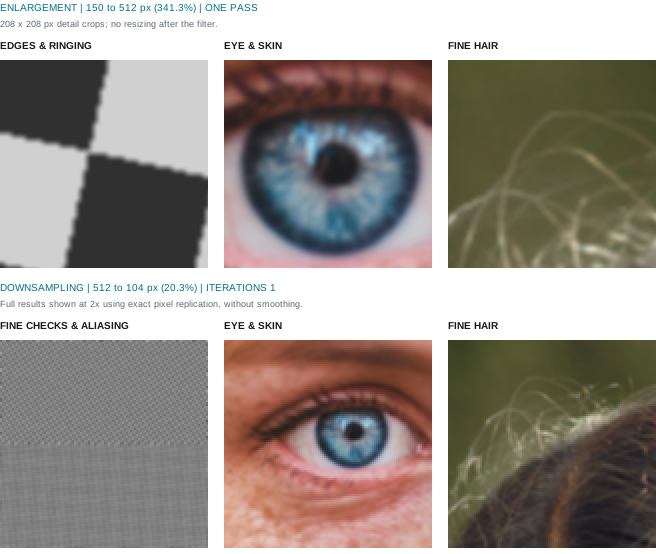
Try it when: a repeating pattern is too distracting and you can afford to soften the image. Try screens, scan lines and woven fabric; judge moving footage as well as a still.
What it does: Notch spreads the blend broadly and gives nearby pixels similar influence. It can quiet a busy repeating pattern, but it softens everything else too: hair, tiny text and subtle texture. It does not find a specific moiré pattern and erase it. Think of it as choosing a deliberately gentler reconstruction. Unlike the sharper cubic filters, it does not add bright or dark halos. Its technical recipe is B = 1.5, C = -0.25; the minus sign here does not mean the filter itself uses negative pixel weights.
Background: Mitchell and Netravali discussed notch reconstruction in their 1988 study of cubic filters (PDF); the term refers to frequency suppression, not a notch cut into the image. This menu entry is a fixed reconstruction kernel, not an adjustable frequency-domain notch-removal tool. Compare it with Parzen when hiding interference matters more than retaining the last bit of bite.
Parzen
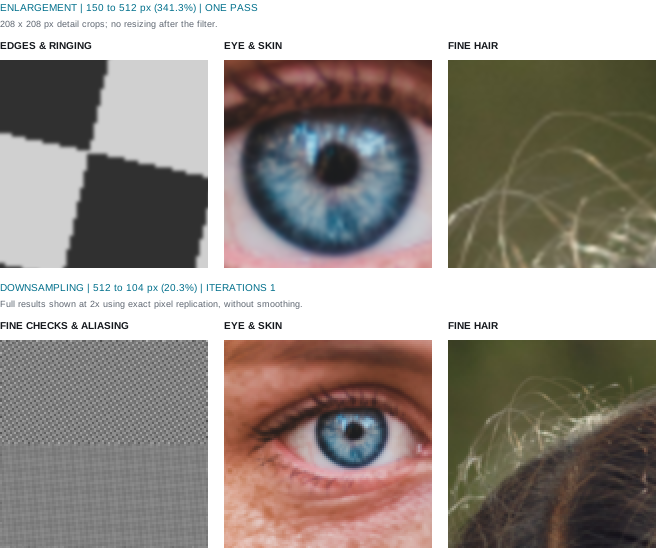
Try it when: smooth transitions matter more than tiny details. Try it on soft graphics, mattes and enlargements where a light fringe around an edge would be especially distracting.
What it does: Parzen lets neighboring pixels blend together strongly, even at positions that line up with the old pixel grid. Edges become rounder and small details lose contrast, without gaining a bright rim or dark outline. That can be welcome for a soft graphic or a matte, and disappointing for a face full of fine hair. Repeated passes can build up the softness. The technical name is a cubic B-spline, with B = 1, C = 0. The gray-edge example above shows its smooth transition beside Lanczos 6's ringing.
Background: the name comes from statistician Emanuel Parzen and the Parzen window used in spectral estimation. His 1961 paper, Mathematical Considerations in the Estimation of Spectra, is a historical reference for that window. The idea came from studying signals, rather than a photo editor. Compositing programs use his name for the cubic B-spline shape used here. He did not invent all B-splines. Also, some spline methods prepare the image differently before filtering, so the word "spline" alone does not promise the same softness in another program. See also SciPy's Parzen window reference and Natron's cubic B-spline naming.
Bell
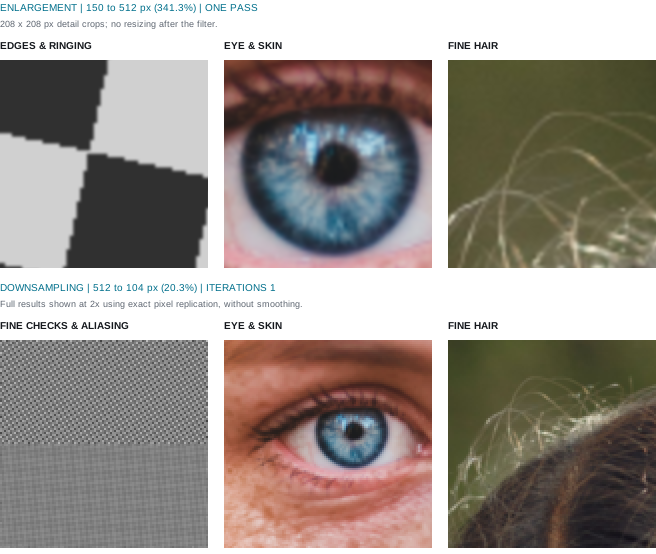
Try it when: Bilinear looks too angular, but a very soft filter loses too much texture. Small illustrations and low-resolution footage make good test subjects.
What it does: Bell gives nearby pixels a smoothly rounded spread of influence. It blends detail gently without adding light and dark halos. Repeated resize passes can make that softness more noticeable, so compare one pass before increasing Iterations. The kernel is a quadratic B-spline, reaching 1.5 source pixels from its center before widening for downsampling. That describes its shape, not a blur radius you need to set. It also blends neighbors at 100% scale, and additional Iterations accumulate that softness without changing the image dimensions.
Background: stacking three simple box averages produces this rounded spline shape (see Unser's spline review). Its bell-shaped appearance makes it easy to confuse with a Gaussian, but the equations and finite support are different. There is no separate inventor claim for the menu name. Think of Bell as another way to soften the transition between pixels, rather than a noise-removal tool.
Cubic
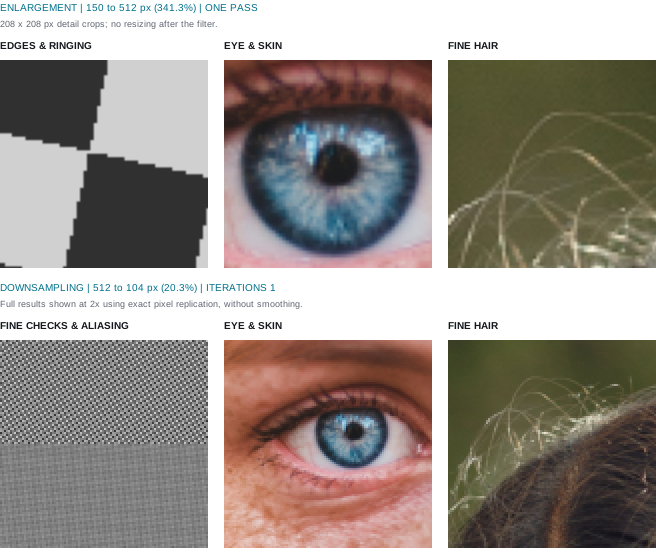
Try it when: you want a smooth enlargement of simple graphics without adding light and dark outlines. Compare it with Bilinear and the softer Parzen.
What it does: This version blends the nearby pixels with an easing curve: the transition starts gently, changes fastest in the middle, then settles gently at the other end. It can feel less angular than Bilinear without adding the halos of Keys or Lanczos. It passes through the original pixel values when the grids line up. Small patterns can still break up when shrinking, so check thin lines rather than assuming that a smooth-looking edge means every detail is safe. The specific recipe here is B = 0, C = 0.
Background: Hermite interpolation supplies the mathematical construction; the label follows compositing terminology. The word "cubic" alone is ambiguous: Parzen, Mitchell, Keys, Simon and Rifman also use cubic polynomials, but different coefficients give different pictures. Do not assume a generic "bicubic" option in another application matches this specific preset.
Mitchell
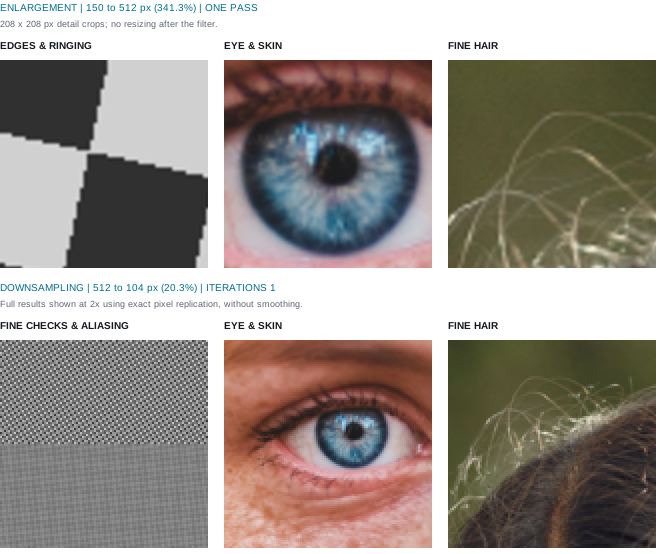
Try it when: you want a balanced starting point for a photo or an image containing both graphics and texture. If it feels too gentle, compare Keys; if it feels too outlined, compare Parzen.
What it does: Mitchell aims for a middle ground: keep edges reasonably crisp without making every edge look outlined. It blends some neighboring detail while adding a little edge contrast. That makes it a useful first test for photographs, illustrations and mixed scenes. It is not completely halo-free; look around a bright highlight against a dark background. If that fringe is distracting, try Clamp Ringing or a softer filter. Its recipe, B = C = 1/3, is a particular compromise, not a promise that one setting will suit every image.
Background: Don P. Mitchell and Arun N. Netravali published Reconstruction Filters in Computer Graphics (1988, PDF), considering perceptual artifacts as well as mathematical behavior. Their compromise became this familiar preset. Mitchell also has a fascinating interest in Soviet exploration of Venus: his Mental Landscape website documents the missions and his reconstruction of their spacecraft images.
Keys
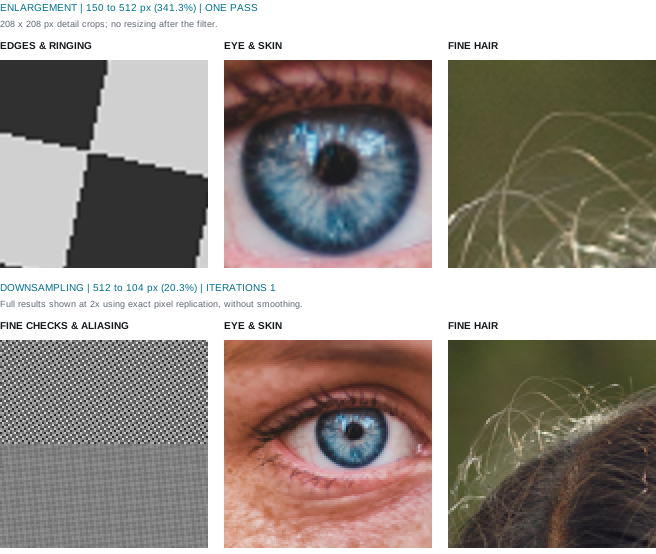
Try it when: a photo, title or graphic looks too soft with Bilinear or Mitchell. Small lettering and hair against a bright background quickly reveal both its strengths and its halos.
What it does: Keys makes edges more pronounced than a simple positive blend such as Bilinear. The trick uses negative weights: some neighboring colors are subtracted rather than only averaged. This helps retain crisp transitions, but can also draw a bright rim or dark trough beside them. Check hair against the sky, white text on black, and transparent cutouts. Keep post-sharpen off while judging the filter, so you can see which outlines come from the resize itself. This recipe is B = 0, C = 0.5, also called Catmull-Rom.
Background: Robert G. Keys analyzed cubic-convolution interpolation for digital images in Cubic Convolution Interpolation for Digital Image Processing (1981, PDF). This setting is a particular member of the cubic family, not a synonym for every bicubic algorithm. If its halos are too strong, compare Mitchell or enable Clamp Ringing. If they are acceptable but you want more bite, Simon is the next useful comparison.
Simon
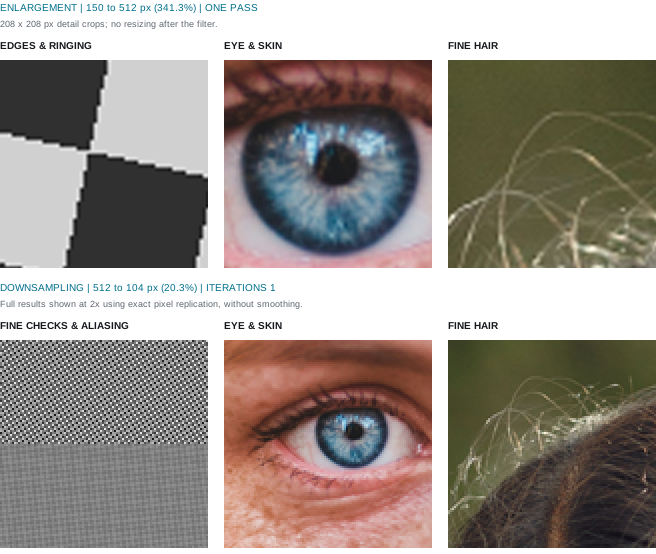
Try it when: you want more bite than Keys gives a soft graphic. Test a crop with skin, fine texture and a bright edge before choosing it for the whole shot.
What it does: Simon uses the same-sized neighborhood as Keys but pushes the edge contrast harder. A soft graphic can look more definite; a clean title can start to look outlined. The extra bite is not newly recovered detail. Check lettering, bright reflections and cutout edges with Clamp Ringing both off and on. Clamping can help with fringes, but also changes the look that made the filter appealing. The recipe is B = 0, C = 0.75: a stronger member of the same cubic family, not an extra sharpening effect.
Background: the name is associated with K. W. Simon, whose 1975 paper Digital Image Reconstruction and Resampling for Geometric Manipulation studied reconstruction for geometric correction of satellite imagery. As Erik Meijering's A Chronology of Interpolation (2002, p. 328, PDF) explains, Simon's idea was to make the two pieces of the filter curve meet with matching curvature: no sudden change in how the curve bends at x = 1. That gives alpha = -3/4, or C = 0.75 in this menu. Simon also examined alpha = -1/2 to preserve a steady change in brightness exactly, so his contribution extends beyond the preset carrying his name.
Rifman
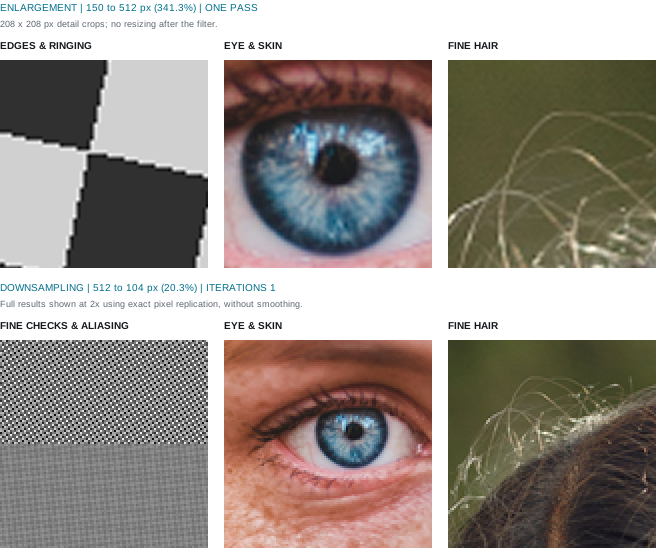
Try it when: you deliberately want a bold, strongly outlined edge. It can suit a graphic treatment, but deserves a close look on titles, transparent cutouts and bright reflections.
What it does: Rifman pushes edge contrast hardest in GPUResize's cubic group. A border can look very crisp, but a bright rim or dark stripe may appear beside it. These marks come from the resize itself, even with post-sharpen switched off. That can be an interesting graphic treatment, or too much for natural-looking footage. Try Clamp Ringing to limit the fringe; try Keys or Mitchell for a gentler edge from the start. The recipe is B = 0, C = 1, using the same neighborhood size as those other cubic filters.
Background: the name is associated with Samuel S. Rifman of TRW Systems Group and his 1973 paper Digital Rectification of ERTS Multispectral Imagery. Meijering's A Chronology of Interpolation (2002, p. 328, PDF) identifies the published kernel as alpha = -1, corresponding to B = 0, C = 1 here. That value makes the kernel's slope at x = 1 match sinc's slope at the same point. It is a specific mathematical design choice from satellite-image reconstruction, not an arbitrary extra-sharp setting or a guarantee of better results on every image.
Lanczos 6
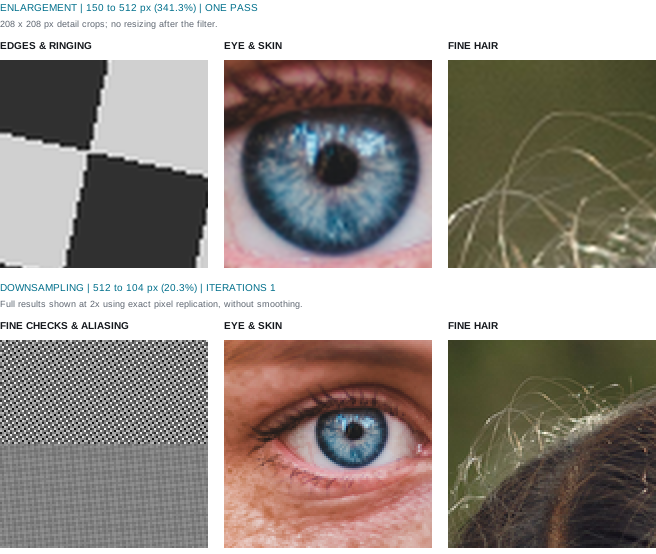
Try it when: you want a crisp resize with visible photographic texture. Test foliage, fabric and small lettering, then check whether silhouettes have gained an unwanted rim.
What it does: Lanczos gives fine detail a crisp reconstruction, but a strong edge can acquire faint light and dark echoes. Those echoes are ringing, shown in the comparison above. The filter starts with sinc, a mathematical reconstruction curve, and gradually fades its outer ripples instead of cutting them off abruptly. Here it reaches 3 pixels to either side, for a total width of 6, before widening for downsampling. Clamp Ringing limits the extra bright and dark values; it does not turn Lanczos into a soft averaging filter.
Background: the name comes from Cornelius Lanczos's sigma-factor approach; Claude Duchon described it in Lanczos Filtering in One and Two Dimensions (1979). This is the radius-3 variant often called Lanczos 3 elsewhere. GPUResize's number counts full kernel width, not an enlargement factor or pass count. Inspect at the final size: a halo that looks dramatic under a loupe can be unobtrusive in delivery, or become objectionable after sharpening.
Lanczos 8
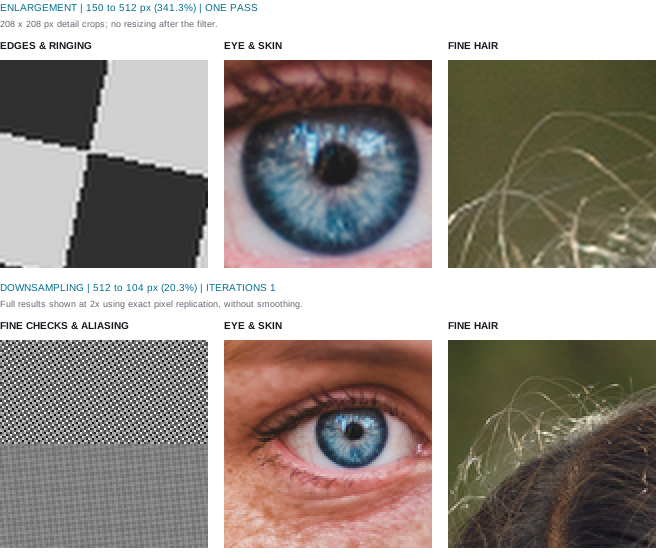
Try it when: Lanczos 6 is close, but you want to compare how a wider filter handles fine detail. Use clean source material: a sharp resize can also make compression marks easier to see.
What it does: This is the same idea as Lanczos 6, with a wider reach: 4 pixels to either side, for a width of 8, before downscale adjustment. More neighbors help shape each output pixel. That changes how fine patterns and edges look, but does not automatically recover more detail. The light and dark ripples around a hard edge also change. Compare a patch of texture and a clean silhouette together: liking one does not guarantee liking the other. More samples also mean more work per output pixel.
Background: this is a wider member of the Lanczos family, not a separate invention by another author; see Duchon's paper. Packages that count radius may call it Lanczos 4. Compare 6 and 8 at identical dimensions, pass count and sharpening settings. If the only visible change is a more noticeable outline, the wider filter may not be buying anything useful for that source.
Lanczos 12
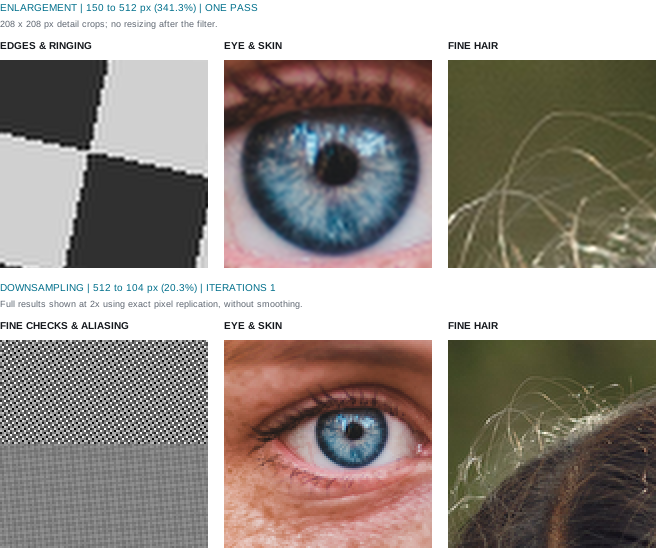
Try it when: you want to explore subtle differences in fine patterns or detailed stills. Treat it as another look to audition, rather than an automatic highest-quality setting.
What it does: Lanczos 12 looks farther around each pixel: 6 pixels to either side, for a width of 12, before downscale adjustment. This changes how it keeps and suppresses very fine patterns. It can also spread ringing farther around a hard edge. A larger number is therefore a different option to compare, not a quality score. Try it on a fabric weave, small lettering and a bright edge against black. If you use several passes, check again: repeated filtering can change the texture substantially.
Background: this is the same Lanczos construction as 6 and 8, with a different support (see PBRT's windowed-sinc discussion). A radius-based naming scheme calls it Lanczos 6, so check the convention when comparing software. Compare it with the narrower options before applying multipass: repeatedly evaluating a broad, ringing kernel can change the texture substantially, rather than simply refining one resize.
Kaiser
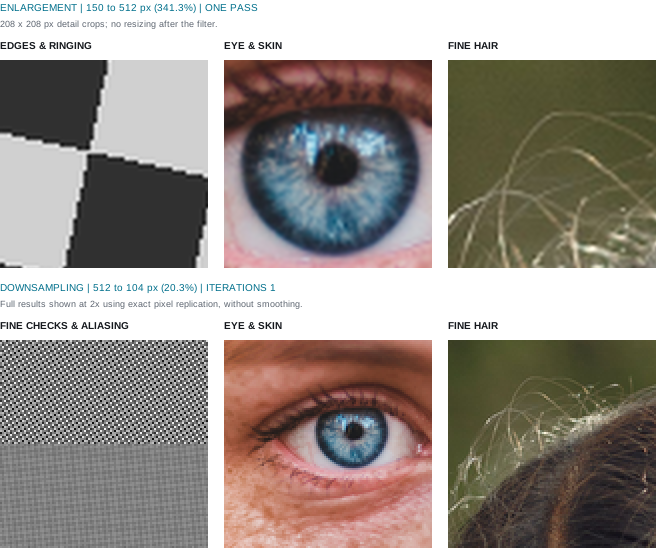
Try it when: you like the detail of Lanczos 6 but dislike its halo pattern. Compare both on small lettering, a bright highlight and a patch of photographic texture.
What it does: Like Lanczos, Kaiser starts with sinc and fades its outer ripples. The difference is the shape used to fade them: a Kaiser-Bessel window instead of a sinc window. Think of two different fade curves applied to the same starting signal. The edge detail and halo pattern can change, which makes Kaiser worth trying when Lanczos feels too harsh. It can still ring. GPUResize fixes its radius at 3 and its window parameter at about 4.123; you do not need to adjust a separate window control.
Background: James Kaiser developed this Bessel-based window for digital filter design; SciPy's Kaiser reference gives the window equation and historical references. The same family is useful in audio and other sampled signals, which is why the name appears outside image processing. Choosing Kaiser here selects one specific windowed-sinc combination, not a general audio-style filter-design interface. Clamp Ringing remains available for overshoot.
Sinc 4
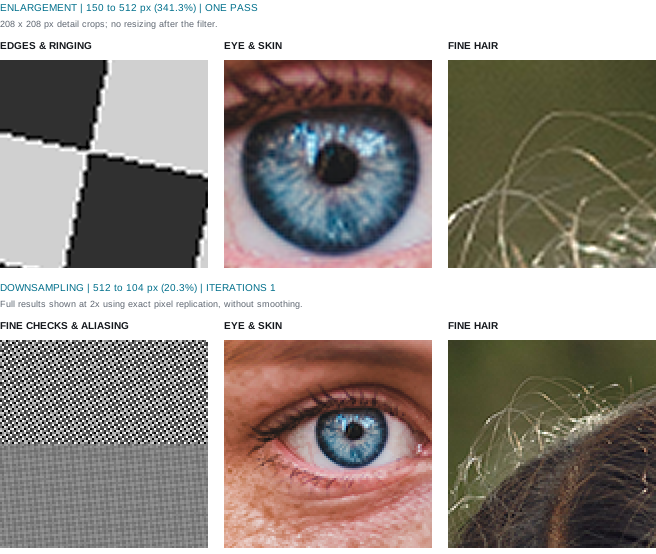
Try it when: you want a deliberately hard edge character or an obvious example of ringing. A gray step or thin bright line makes the effect easy to inspect.
What it does: Sinc 4 keeps a short piece of the sinc curve and cuts it off at 2 pixels to either side, for a width of 4. There is no extra fade toward the cutoff. That abrupt ending can produce obvious light and dark fringes, even though this filter is narrower than Lanczos 6. It is useful for exploring a harder edge character, but not a neutral choice for every image. Clamp Ringing limits values brighter or darker than the contributing pixels; it cannot promise to remove every visible band.
Background: sinc is the reconstruction function associated with classical band-limited sampling theory; PBRT's reconstruction chapter explains its practical limitations. The ideal mathematical form has infinite support; GPUResize's finite Sinc 4 is a practical, visibly different approximation. The width follows the same naming convention as Lanczos 6/8/12. There is no claim that a four-pixel truncation reproduces the ideal theory for arbitrary photographs or graphics.
EWA LanczosSharp
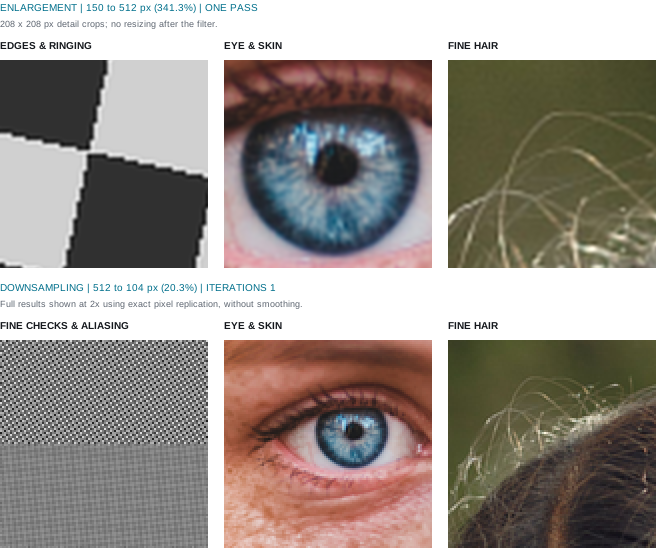
Try it when: diagonals, curves or uneven horizontal and vertical scaling look awkward with ordinary filters. Try slanted lettering and a small circular highlight beside Lanczos 6.
What it does: Ordinary separable filters work along rows and columns. EWA gathers pixels in a round or oval neighborhood instead, so a diagonal or curved edge can get a different treatment. Its radial curve is called jinc, and this version includes a small sharpness adjustment. It can still create halos. GPUResize changes the footprint with the horizontal and vertical scale; it does not rotate and reshape that footprint to follow every local distortion. Very large reductions use a preliminary reduction automatically. That internal step is separate from your Iterations setting.
Background: EWA stands for Elliptical Weighted Average, a resampling framework described in Paul Heckbert's Fundamentals of Texture Mapping and Image Warping (1989, PDF). The later LanczosSharp tuning is associated with Nicolas Robidoux. It is not simply ordinary Lanczos run twice, and it need not preserve tiny horizontal, vertical and diagonal patterns in exactly the same way.
FSR 1 EASU
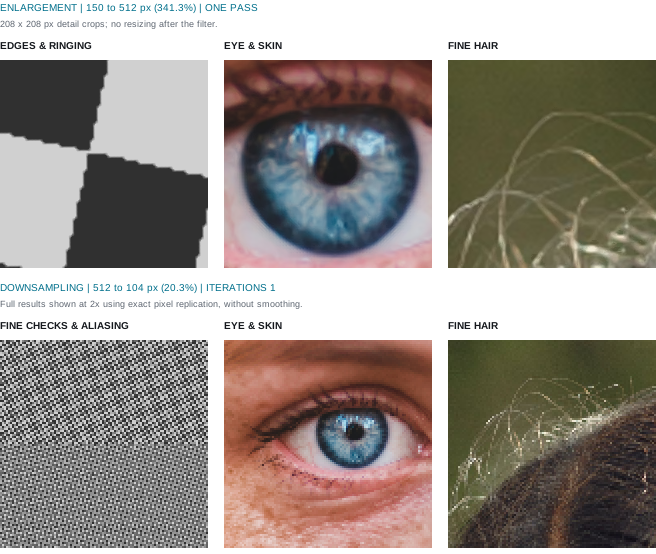
Try it when: you are enlarging an image with clear edges and fixed filters leave them too soft. Compare the outline and the interior texture separately, especially on hair and rendered graphics.
What it does: EASU looks at local edges and adjusts the blend to their direction. A slanted outline can hold together better than with a fixed filter, while fine texture may look different. Judge both. It works from the current image alone: no previous frames, motion vectors or invented subjects. It can also blend the colors of pixel art, so it is not a substitute for Nearest when the palette must stay exact. GPUResize exposes EASU here; RCAS sharpening is a separate optional step, not something secretly added by this choice.
Background: AMD released FidelityFX Super Resolution 1 in 2021 for real-time graphics. The downsampling row above uses GPUResize's Area fallback, not EASU. GPUResize's ordinary rectangular resize uses Area if either axis is reduced. At 1:1 and in Free Distort it uses the EASU path. Do not interpret the FSR name as temporal reconstruction, frame generation, or an automatic sharpening stage.
Pixel - Scale2x
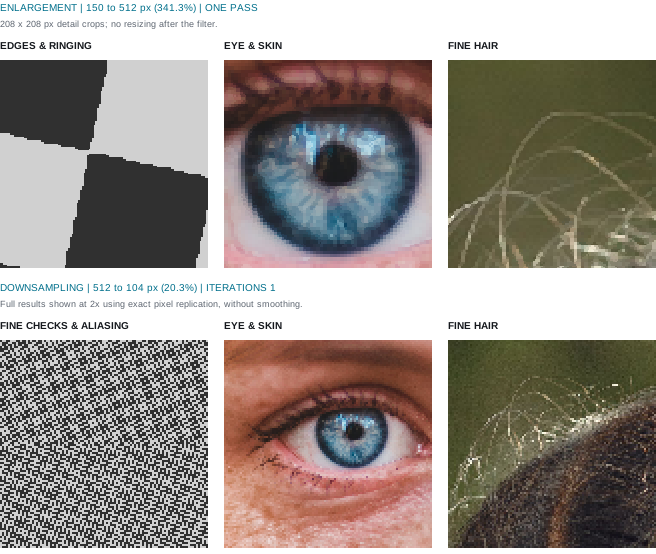
Edge sensitivity: 50%. The photos show the same test for comparison; this method is intended for pixel art. See the pixel-art example above.
Try it when: you want to smooth the stair-step shapes in a sprite or pixel font while keeping its limited palette. Keep Nearest beside it to see what changed from the original artwork.
What it does: Scale2x looks at the colors around each source pixel and asks whether they suggest a corner or a diagonal. It then copies a neighbor's color into part of the enlarged pixel instead of blending new colors. The staircase changes shape while keeping a limited palette. GPUResize adapts this rule to the size you request. Higher Edge sensitivity requires closer color matches; lower values let more different colors count as a match. Check tiny eyes and lettering, especially after several passes: a tidier contour is not necessarily the artist's intended drawing.
Background: Andrea Mazzoleni developed Scale2x for AdvanceMAME in 2001; the original project documents its relationship to the earlier EPX rule. GPUResize's adjustable, arbitrary-size implementation is not a promise of bit-for-bit behavior from historical Scale2x or the separate Scale3x algorithm. Integer enlargement ratios are the easiest comparisons to read.
Pixel - Eagle
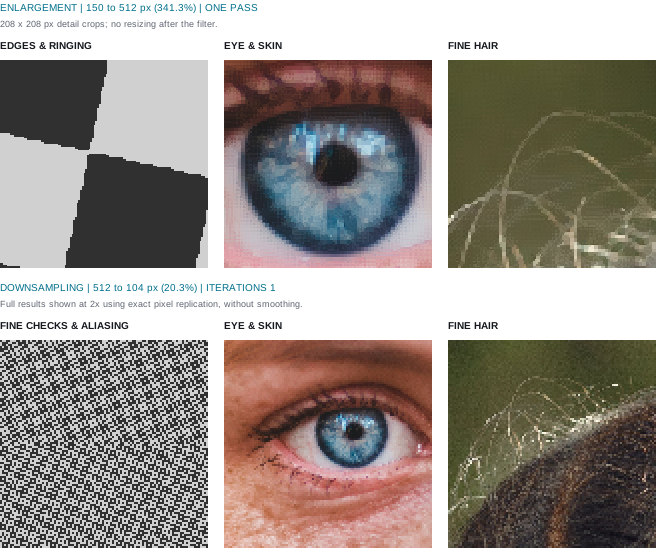
Edge sensitivity: 50%. The photos show the same test for comparison; this method is intended for pixel art. See the pixel-art example above.
Try it when: you want rounder, more connected pixel-art shapes than Nearest gives. It can also make a useful retro or melting-pixel effect; watch the smallest details.
What it does: Eagle checks three neighbors around each corner of a pixel. When they agree, their color can replace that corner in the enlarged result. This can round a staircase or connect nearby shapes, but it can also erase a one-pixel dot. That dot might be an eye or a highlight, so always inspect small features. Higher Edge sensitivity asks for closer color matches, just as in Scale2x. Repeating the process can gradually reshape the artwork. It can be useful creatively, but is not guaranteed to preserve the original drawing.
Background: Eagle belongs to the emulator-era family of pixel-art enlargers. GPUResize uses an adjustable local neighbor rule; no claim of exact historical implementation parity is made. It is not a conventional blur or an AI reconstruction. The pixel-art figure shows why keeping the original palette does not necessarily mean keeping the original silhouette.
Content-Aware
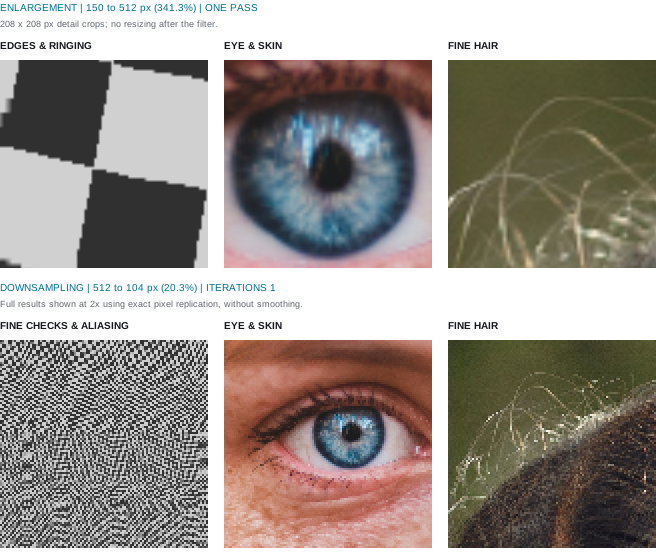
Amount: 100%; Rigidity: 50%. This method can redistribute the image, so changes in shape are part of the result.
Try it when: you want to explore uneven resizing or animated distortions and glitches. Start with a simple image; faces, text and buildings make changes in proportion very obvious.
What it does: Instead of spreading every part of the image evenly, this method measures contrast and gives different regions different amounts of space. It can also use alpha boundaries. It does not recognize a face, read a word or remove seams. Amount controls how far the result moves away from ordinary scaling. Rigidity makes the distribution more even; at 100%, the uneven redistribution disappears. Each iteration examines the changed image again, which can build up a distortion or glitch. Watch faces and lettering: a high-contrast region is not always the thing you wanted to protect.
Background: content-aware resizing is a broad class of methods, not one uniquely defined filter. This entry describes GPUResize's contrast-based axis remapping, so authorship of a different retargeting algorithm is not borrowed for it. Treat "important" as a numerical contrast estimate, not an understanding of what you want the viewer to notice.
Multipass
Iterations sets the number of filtering passes. Additional iterations distribute a large resize over several progressively sized passes. Repeated integer sizes are retained, including when the entire resize is 100%. The selected filter is evaluated on every pass, so its character intentionally accumulates rather than being normalized to match a single pass.
Content-Aware, Scale2x, and Eagle also support multiple iterations.
In Free Distort, the shape stays the same. GPUResize first resizes the image in steps, then stretches it to your four corners once, at the end. Changing Iterations changes the filtering along the way, without repeatedly folding or stretching the shape. These steps head toward the width and height of the smallest rectangle enclosing your four corners. If that rectangle is the same size as the source, the first N-1 passes still filter at 1:1 and the Nth pass applies the filter through the warp. Rounded sizes never reduce the requested number of passes. Post-sharpen, if enabled, runs once afterwards.
More passes mean more processing, not automatically more detail. Imagine actually shrinking a picture to 10% and then enlarging it again: the second step cannot bring back everything the first step threw away. Nuke's transform concatenation can combine compatible transforms before sampling, avoiding those intermediate images. GPUResize's Iterations deliberately creates intermediate images so you can explore the accumulated softness, edge contrast or distortion. Start with one pass and add more when you prefer the result.
Post-sharpen
Try it when: the resize looks right, but edges or texture feel a little soft at the final size. Choose your resize filter with sharpening off, then add sharpening as a finishing touch. Check the result at 100% zoom.
What it does: Post-sharpen makes existing edges and texture stand out by increasing their contrast. It runs once, at the final output size, after all resize steps and any Free Distort warp. It is off by default; Amount sets the strength from 0 to 200%. Both methods leave transparency unchanged.
RCAS
Try it when: you want a quick crispness adjustment without choosing a blur radius. Watch fine hair, fabric and grain as you raise Amount.
What it does: RCAS compares each pixel with its four closest neighbors and adjusts sharpening to the local contrast. Noise protection reduces the sharpening where a pixel stands out from its neighbors in a way that may be noise. Raise it if grain becomes too prominent; lower it if fine texture loses the bite you want. It holds back sharpening rather than removing noise, and it can affect real detail too.
Background: RCAS means Robust Contrast-Adaptive Sharpening. It is the sharpening step in AMD's FidelityFX FSR 1. Here it is an independent option: you can use it after Lanczos, Mitchell or any other resize method.
Unsharp Mask
Try it when: you want to choose both the spread of the sharpening and how much subtle texture it affects. Start with a small Radius for fine detail, then try a larger value for broader edge contrast.
What it does: Unsharp Mask makes a blurred copy of the resized image, finds the difference from the original, and adds some of that difference back. Despite the name, the result looks sharper.
Radius controls how far the blur reaches around each pixel, measured in output pixels. Small values keep the effect close to edges; larger values spread it farther and can create bright or dark halos. Threshold sets how large the brightness difference between the original and blurred copy must be before sharpening takes effect. Raise it to leave subtle variations in skin or sky alone; lower it to include finer texture.
DaVinci Resolve
Try it when: you need the next node in Fusion to receive the resized frame at its new dimensions. Use the GPUResize 2 Fusion macro included in the package.
Why the macro matters: the OFX effect resizes the picture, but Resolve can still report the original frame dimensions to later nodes. The macro passes on the new dimensions as well, without resizing the picture again. For example, after a resize from 1920 × 1080 to 960 × 540, the following nodes should receive a 960 × 540 frame. The standalone OFX effect is also available for other OpenFX hosts and troubleshooting in Resolve.
Practical notes
- Inspect transparent edges over both light and dark backgrounds.
- Area is a strong starting point for reduction; detailed filters are useful when their edge ringing is acceptable, or with Clamp Ringing on.
- 8 and 16 bpc output is clamped to the legal range of the host. 32 bpc float keeps the overshoot of sharp filters, so turn on Clamp Ringing there if halos show.
- Nearest, Scale2x, and Eagle are intended for artwork where blended pixels are undesirable.
- For extreme changes, compare one iteration with several iterations at full output resolution.
- Apply post-sharpen while viewing the final delivery size rather than a scaled preview.